In Fusebase, you can fully automate working with your databases and dashboards. With automation, you can significantly simplify managing tasks, the sales pipeline, vacancies, and much more.
It is important to note that in Fusebase you can integrate our tools with other services like Slack, Gmail, etc. And the built-in AI agents will help simplify and improve working with content in databases.
I would like to remind you that an automation flow consists of a trigger and actions. The trigger is what initiates the flow, for example, submitting a form or creating a row in a table. Actions are the commands executed within the flow, such as sending an email or updating a page.
Let’s take a look at which triggers and actions are available for database automation in Fusebase.
Triggers #
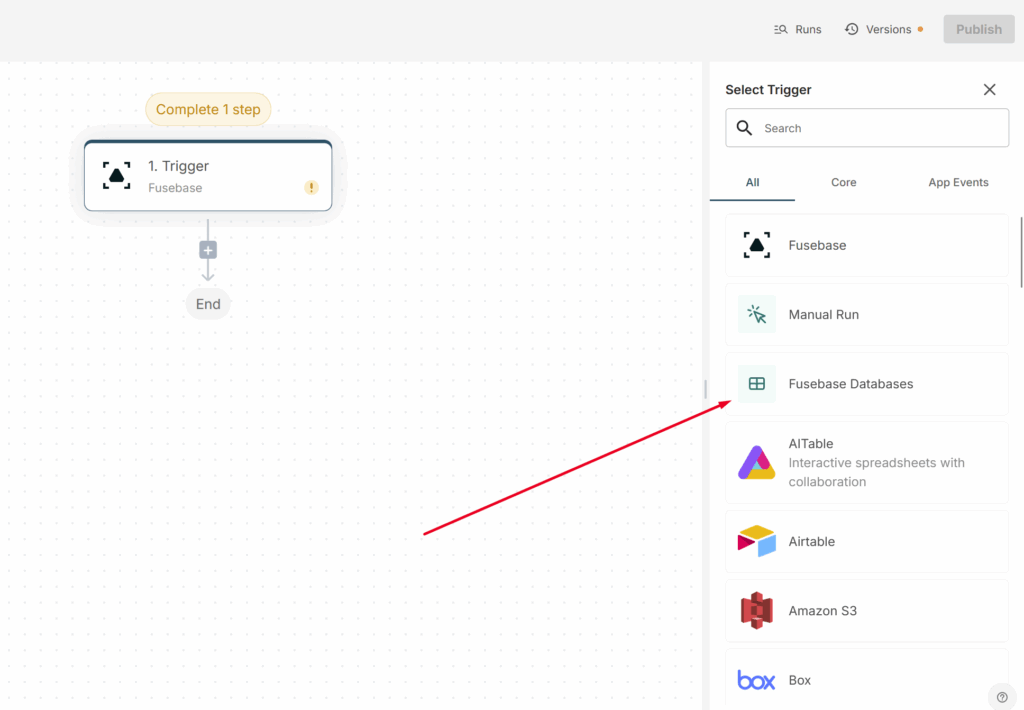
Triggers for databases are available in Fusebase Databases.
The New database and New table triggers #
These triggers initiate a flow when a new database or a new table is created within a specific database.
New row added #
The flow is triggered when a new row is added to the database.
To activate the trigger, you need to select the database and the table for which the trigger will respond to the creation of a new row.
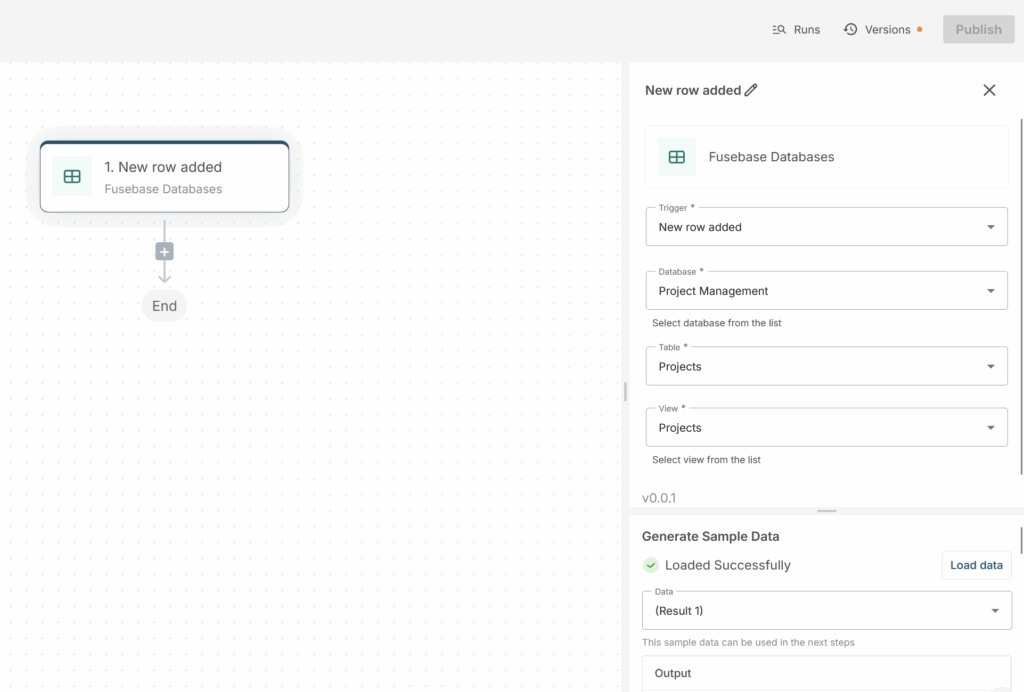
The output also includes the contents of the row cells (the trigger runs with a 3–5 minute delay so it can return the full row contents, not just its name).
Next, the data from this row can be passed to subsequent actions, such as sending it to Slack, creating a task in Asana, and so on.
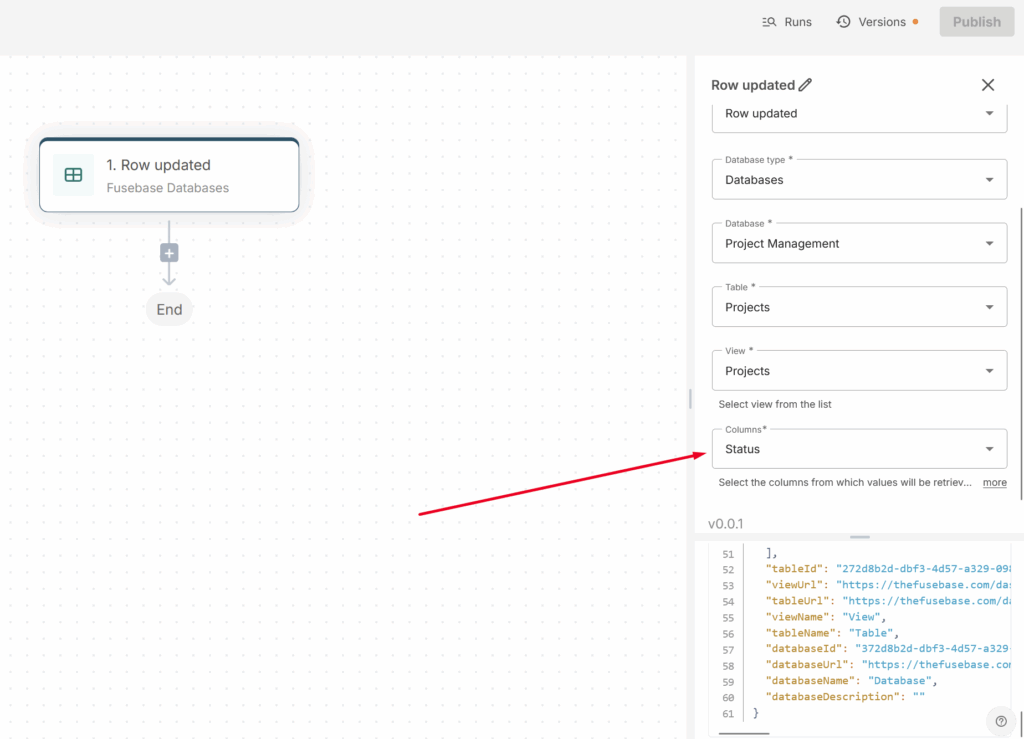
Row updated #
The flow is triggered when a row in the database is updated. The flow can run when any row is updated or only when a specific row is updated. You can also fine-tune the trigger criteria: for example, the trigger can start the flow only when a specific column (or columns) in the table is updated.
For instance, you create an approval flow where an email notification should be sent to the client only when the status in the Review Status column changes. You create a flow with Row updated as the trigger and set it to react to the Review Status column. When you change the status, the client receives a notification.
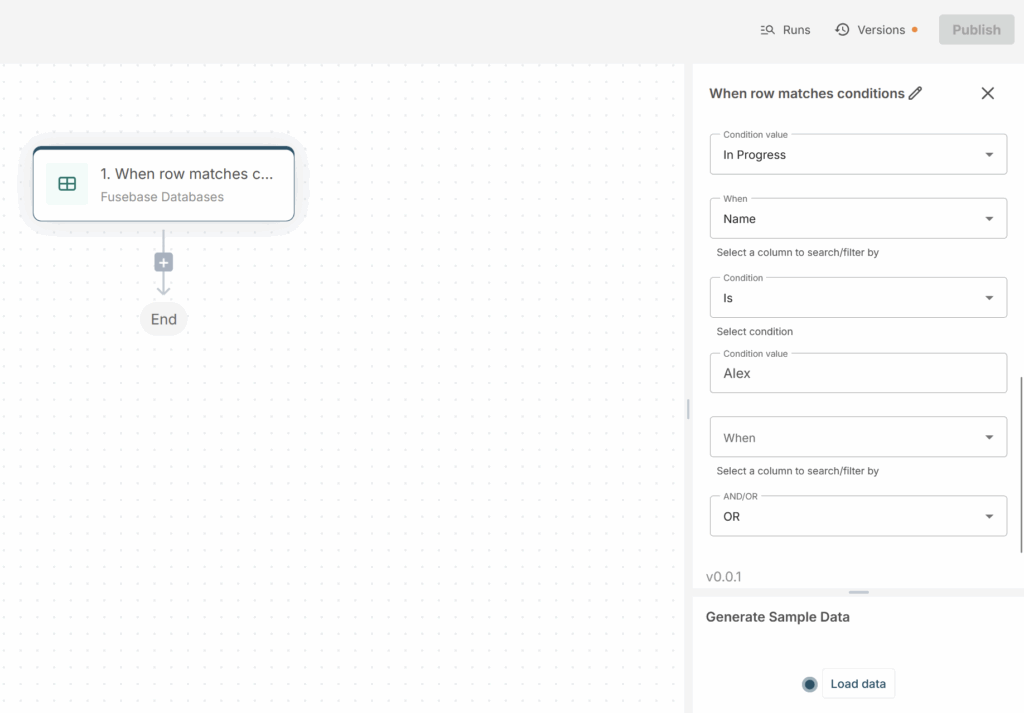
When row matches conditions #
The trigger is activated if the data in the selected column matches the values you set. For example, you can start a flow when the value in the Status column changes from “In Progress” to “Done,” or when a deal amount exceeds $10,000.
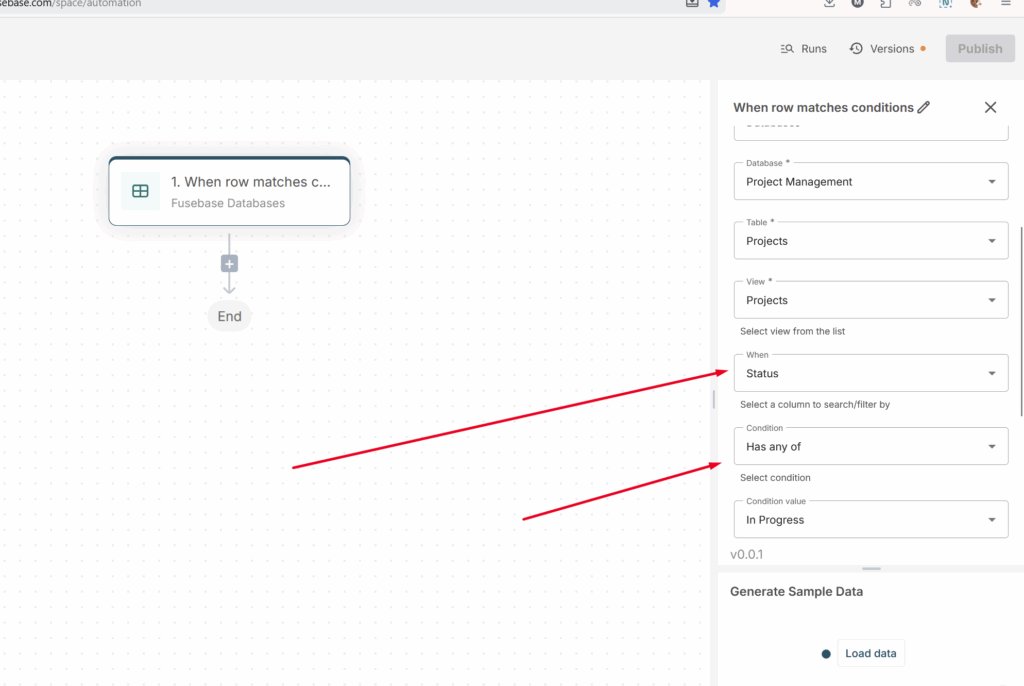
All you need to do is specify the condition or conditions under which the flow should be triggered. You can also select the AND or OR operator. With AND, all specified conditions must be met for the flow to activate; with OR, any one of the conditions is sufficient.
Actions #

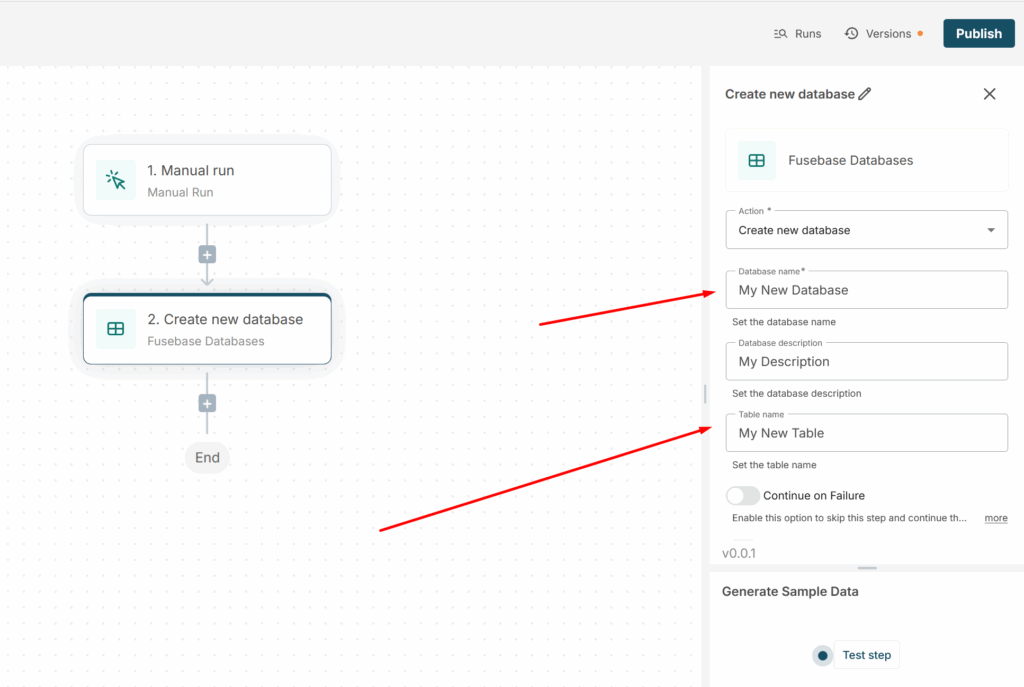
Create new database #
Creates a database and a table in it. All you need is to specify the database name, its description, and the table name. You can specify this manually or take it from another database or table.
Create new table in new or existing database #
Creates a new table in an existing or new database (which can be created in another trigger or action). You can immediately specify the list of columns that will be created in the table.
You need to select the database in which the table will be created or use its ID from another action or trigger.
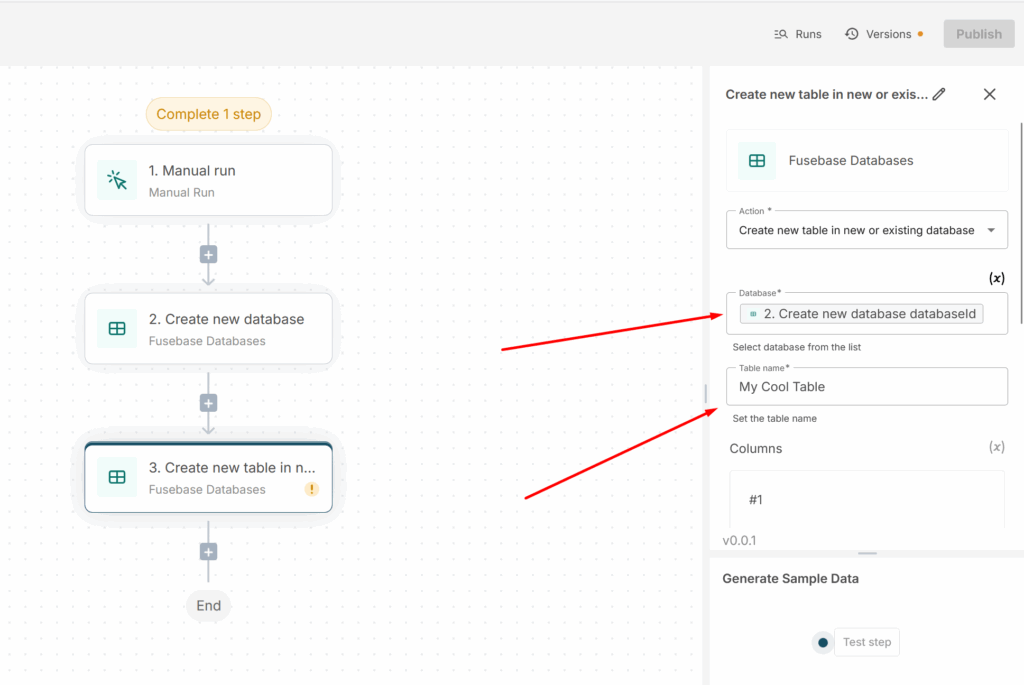
You can also immediately select the columns that will be added to the table. Just click New Item to create a new column, then specify its name and select the column type.
Create row in existing table #
Creates a new row in the selected table. You can specify the data that will be added to the cells of the new row for each column. The data can be added manually or obtained from another action or trigger.
For example, you have a table of meetings with clients and you want each new meeting to be added to the corresponding table with meeting data. Later, this table can be linked to the clients table via relations.
Update row in existing table #
This action updates a row in the selected table. You can either choose the row to update yourself or select it from another action or trigger. The row’s cells will be updated with the data you specify or that comes from another trigger or action.
You can select the row manually or get it from a trigger or action. For example, you can get a row from the When a row matches conditions trigger and update its values (for example, add a meeting or approve a document).
Find Row #
With this action, you can find rows in a table by various parameters. For example, you can retrieve all rows and their values from a specific view (for instance, if you need to send a list of tasks by email), or all rows that match certain conditions: text in the title, a specific label, or numeric criteria (for example, you need a list of companies with more than 500 employees).
All you need to do is select the database, table, and view, and specify the search/filter conditions. In the output, you will receive a list of the found rows.
You can also make the search conditions stricter and, for example, use the AND operator, which will return only the rows that meet all the conditions. For example, you may need to show a list of all companies with more than 500 employees and that are located in the USA.
For example, if you need to find only the tasks that are in the “To Do” or “In Progress” status, you can then, for instance, send their list by email.
If there may be too many results, you can limit their number. For instance, if you specify 10, only the first 10 matching rows will be returned.
Get Row’s Columns Value #
This action allows you to retrieve current values from the columns for specific rows in the view table.
All you need to do is select the database and table, and then specify the row (or rows) from which you want to retrieve the data (you can select it manually or use its ID from a trigger or action).